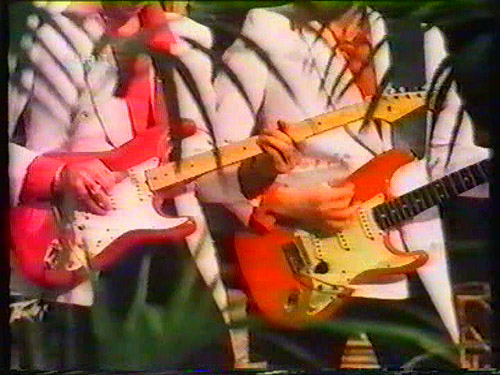
Two interesting live clips of Dire Straits Six Blade Knife

Jean-Francois wrote in a comment:

I didn`t know where to post this :
Somme years ago, I remember you talked on mKnews forum about Six blade Knife on 17/02/1979 in Cologne that has a longer solo in the middle than usual.
I`ve never heard it. It would be very nice from you if you could send it to me, or at least put it on your blog.
Also, I`ve never heard Six blade Knife from Split 85, but read great reviews about it (T.Molin or JVT). I know it isn`t complete, but I`m very curious to hear how it sounds.
Could you do to me(or to us) this favour please ?

No problem, here are audio clips from both. The first is from Cologne, February 17, 1979 – one day after the Rockpalast TV show. This was a radio broadcast for “WDR Nachtmusik” on Germany’s radio station WDR2. The broadcast was about 55 minutes and was recorded at the “Große Sendesaal” at WDR’s headquarter in Cologne – a room that had been well-known for radio concerts for some decades. Unfortunately they had some problems with hum from the lights so they decided to play without a proper light show (there was just a small audience).

I am not sure if it has to do with the right timing to fill exactly the given time frame, but Mark played the solo in the middle of Six Blade Knife longer than he normally did, and they started What’s the matter with you Baby differently (with a longer drum intro, something they did also in Rotterdam 1978 – another radio show).

There are a few different versions of this show around. There was a vinyl bootleg by the La Salle label which has the intro of Down to the Waterline but the last two songs are missing (a vinly LP only allowed about 45 minutes).The sound is alright but there are audible variations of the tape speed – in German we say “leiern”.

A few years later this concert was re-broadcasted and I recorded it myself on a tape cassette. The sound was good, but it was without the intro of Down to the Waterline and the last verse of Southbound Again. When I got my first CD writer, I made a CD-R from this tape and added the intro of the vinyl bootleg. I think this is still the version that is around among fans who collect bootleg recordings.

I also had a tape with the complete show (but in worse sound quality) that also had the end of Southbound Again, but this tape has disappeared somehow, I have not seen it for many years but I still believe it must be somewhere here.


The other Six Blade Knife clip is from Split, former Yugoslavia, April 25, 1985. This was the beginning of the Brothers in Arms show. They soon dropped the song so there are no further recordings of this different version. Unfortunately we only have an incomplete clip of it.

 

Mark Knopfler’s Sultans of Swing amp – The brown Fender Vibrolux

Mark Knopfler got his first Strat only shortly before Dire Straits were formed. Before that time he had played a Gibson Les Paul Special through a Selmer tube combo amp in a band called The Cafe Racers. It is not clear if he owned the Selmer amp or if it was borrowed. What we know is that when he got the Strat, he plugged it into a Fender Vibrolux which probably belonged to Dire Straits’ bass player John Illsley. Today however, it is still in Knopfler’s possession.

This amp was a Fender Vibrolux from the early 60ies  – from the brown-tolex era. Internally Fender called this model 6G11 (first revision), or 6G11-A (second revision, the more common version to be found).

The brown Vibrolux is a really wonderful amp: with about 30 watts from two 6L6 tubes it has enough power to be played in a band with drums and bass, yet it is  small and light. It has one 12″ speaker (an Oxford 12L6 or 12M6)  and a tremolo effects. Unfortunately it has no reverb (a feature Fender introduced with the later black face series, the only brown amp with reverb was the 2 x 10″ Vibroverb from about 1963), with reverb the Vibrolux might have been the ultimate small combo amp. The rectifier is also a tube.

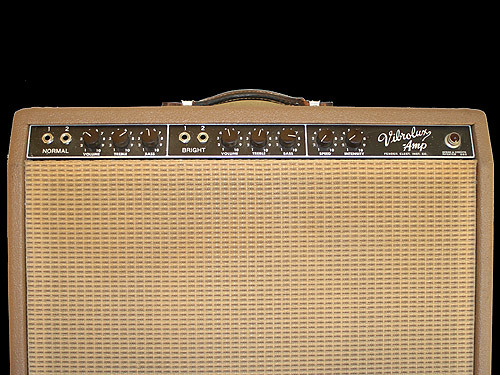
The controls are pretty much standard: One channel with Volume, Treble, Bass, the second channel with Volume, Treble, Bass, and two tremolo controls (Speed, Intensity) which affect both channels. There are no bright switches – another feature introduced with the black face amps. However, the second channel is called “Bright” as a small condenser across the volume poti adds some treble – the same circuit as a bright switch, just not switchable.

The Vibrolux does not have a Fender logo on the front grill cloth – the one on Knopfler’s amp is not original.

From the time of Golden Heart - Note that the Fender logo is not original. It is that far in the corner of the front grill because there is no wood under the grill cloth to hold any screws.
From the time of Golden Heart – Note that the Fender logo is not original. It is that far in the corner of the front grill because there is no wood under the grill cloth to hold any screws.

Knopfler played this amp live in 1977 and early 1978. There is only a limited number of live pictures  from 1977, and most do not show any amps.  We have the following sources from this period that mention the Vibrolux:

a) Knopfler himself said in a an interview that Sultans of Swing was first written in open tuning on a National steel guitar, but it was totally changed when he got his Strat and played it through the Vibrolux.

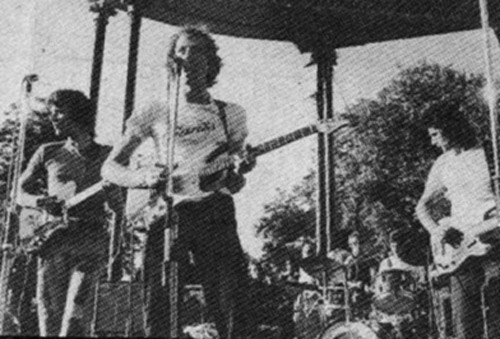
b) There are two pictures from an early live gig at the bandstand on Clapham Common, London, September , 1977 (two months after recording the demo of Sultans of Swing, five months before the recording of the first album in February 1978)

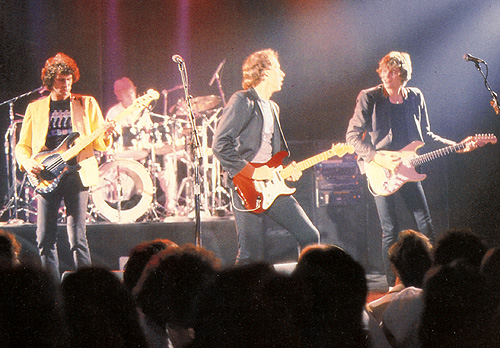
One of the earliest photos of Dire Straits - note that Knopfler uses the bright channel of the Vibrolux
One of the earliest photos of Dire Straits – note that Knopfler uses the bright channel of the Vibrolux
... and another picture from the same gig
… and another picture from the same gig

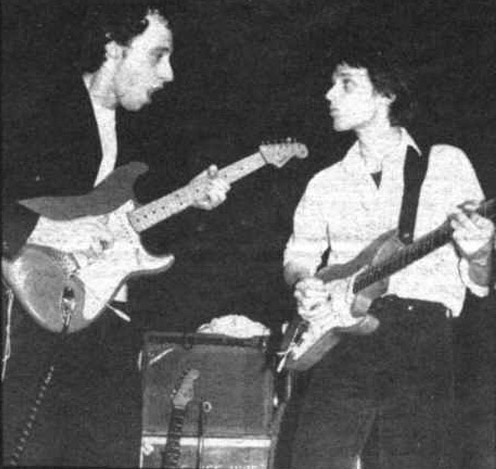
c) Two pictures from the Roundhouse, London, January 1978 (more info).

d) One picture from the Marquee, March 1978

vibrolux-marquee

e) A personal interview with Chas Herington who was the engineer on both the demo and the single version of Sultans of Swing (both recorded at Pathway studio, July 1977 and April 1978, the song was re-recorded two months after the recording of the first album because the record company wanted more of a rock sound for the single). He also told me that it was mic’ed with a Neumann mic.

There is no evidence that this amp was played on the Sultans of Swing version of Dire Straits’ first album (recorded in February 1978). Possibly different amps were used here (Twin Reverb, Jazz Chorus, and the Vibrolux). In about May 1978 Knopfler started to play Fender Twin Reverbs on stage. The Vibrolux reapperad with the Notting Hillbillies and is still frequently used these days in Knopfler’s British Grove studio.

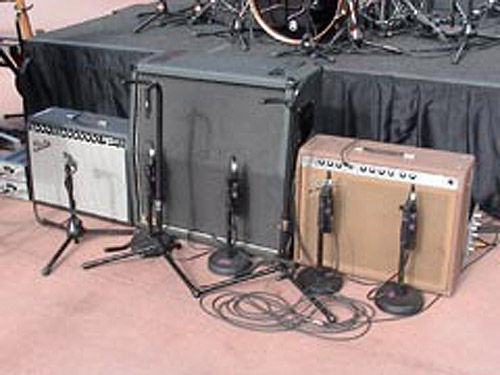
This is NOT the Vibrolux but Knopfler's Vibroverb (4 controls instead of three on second channel, one more for the reverb)
This is NOT the Vibrolux but Knopfler’s Vibroverb (4 controls instead of three on second channel, one more for the reverb)

I know that Knopfler’s amp does not have the original Oxford speaker anymore. I talked with Knopfler’s guitar tech Glenn Saggers about this amp some years ago on on a Notting Hillbillies gig, and he told me it had a Celestion speaker. Unfortunately he did not remember which model (they can sound very different) so I gave Glenn a self-addressed postcard and asked him if he might send it to me after checking the amp the next time. I did not really expect he would remember it, or find the time, but some months later I in fact  got a card with the answer: a Sound City speaker  -these were often produced by Fane (Thank you Glenn if you ever read this 🙂 )

Here are some detail pictures of a 1961 Vibrolux:

1961 Brown Fender Vibrolux

Red – redder – the reddest: fiesta, dakota, candy apple, hot rod, and more Fender colours

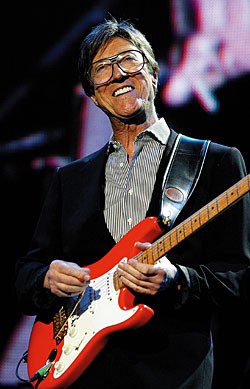
A red Stratocaster has always been one of THE rock’n’roll logos – something that started with Hank Marvin, guitarist of the Shadows, who had the first red Strat in England. He started a desire for exactly this guitar among thousand of English kids in the early 60ies, one of these was a kid named Mark Knopfler. In fact it was rather coincidence that Hank Marvin got a red Strat: he wanted a guitar like his idol James Burton (guitarist for Ricky Nelson) but unfortunately nobody knew for sure what guitar Burton played except that it was a Fender – no internet, hardly magazines, only little information in the 60ies.  So Marvin ordered the most expensive Fender (Cliff Richard bought it for him) from the catalogue – and this was a maple-neck Stratocaster with gold parts and custom colour – fiesta red. (James Burton played an ‘ordinary’ Telecaster by the way.)

Hank Marvin with a fiesta red Strat (here a later reissue)

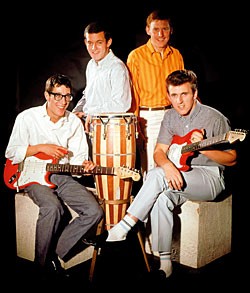
Hank Marvin soon became a synonym for the red Strat. The next picture shows him with a fiesta red Strat with rosewood fingerboard. There is even a rumour that Selmer (Fender’s UK distributor back then) could not satisfy all demands for red Strats and thus simply refinished sunburst Strats in their own factory. (There is contradicting information about if this is really true and to what extent.)

The Shadows - Hank Marvin (left) and Bruce Welch (right) both with a fiesta red Stratocaster

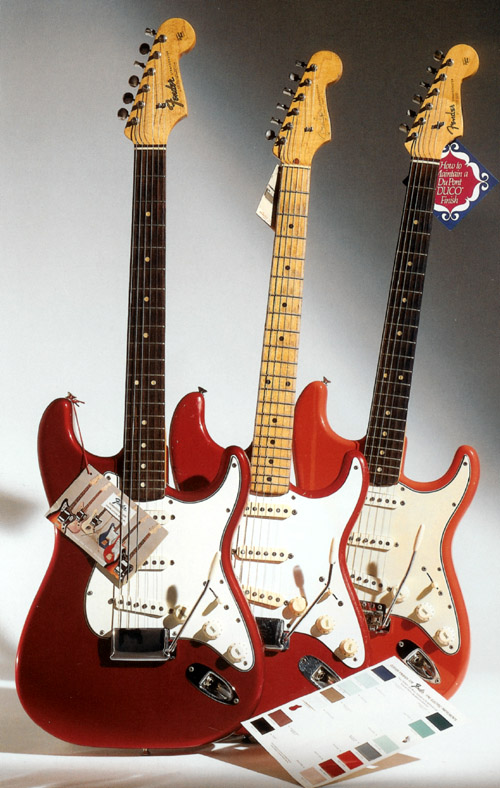
In fact, Fender did not only offer Fiesta red but also some more, different kinds of red. One is Dakota red which is darker than fiesta and closer to the firebrigade red .

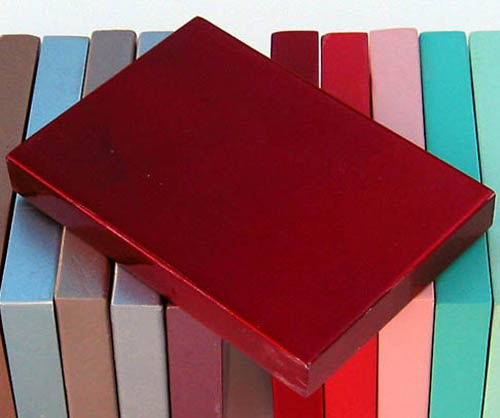
And a third one was a metallic red called candy apple red which looks similar to Dakota on many pictures that often do not justice to that metallic look. Candy apple red means the guitar is finished in silver or gold first before a translucent red finsih is added. For this reason there are two different variations around (over silver and over gold), the one over gold looks warmer. Mark Knopfler’s red Schecter is an example of this finish.

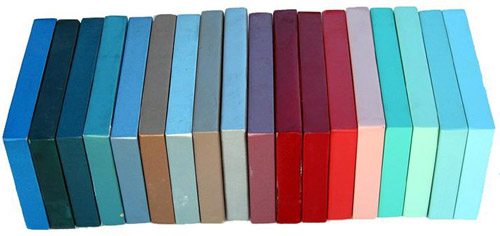
The following pictures (courtesy of curtisnovak.com) show the different colours in direct comparision.

All Fender custom colours from the 60ies, the three red samples are from left to right: candy apple, Dakota, fiesta
Candy apple red (metallic)
Dakota red
Dakota red
Fiesta red
Fiesta red
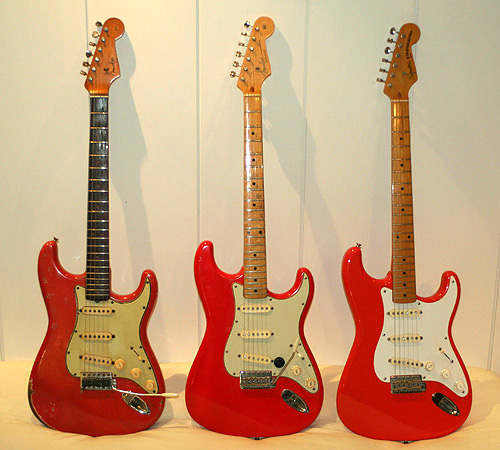
A '65 Strat in candy-apple-red (left), a '58 in Dakota red (center), and fiesta red (right)
A '65 Strat in candy-apple-red (left), a '58 in Dakota red (center), and fiesta red (right), picture courtesy John Peden
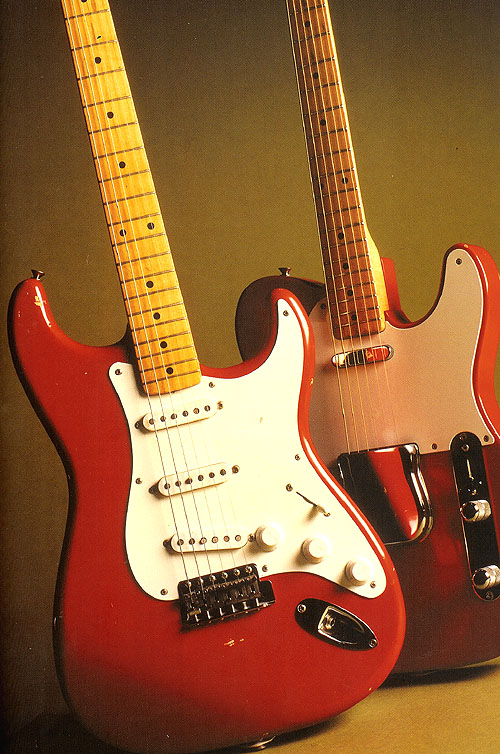
Cimarron red -  a rare Fender custom colour, here on a '55 Strat and a Tele
Cimarron red - a rare Fender custom colour, here on a '55 Strat and a Tele, picture courtesy John Peden
Original fiesta red (left), the refinished Strat in the middle is similar to hot rod red, the fiesta red Squier (right) is more towards an orange-red
The Schecter Strat in candy apple red

The two red Fender Stratocasters that Mark Knopfler played in the late 70ies when he started with Dire Straits were both refinished. As at that time noone refinished to any exact vintage Fender specifications, they were simply ‘some’ red, both did not not meet any of the original Fender colours. The one with the rosewood board (S.-No. 68354, he still has this one) was lighter and more of an orange, and closer to fiesta red than the one with the maple fingerboard (S-No. 80470), which was darker and more towards Dakota red. However, the 68354 was ‘redder’ than fiesta red which sometimes has a tendency towards tomato soup, while the 80470 was lighter and brighter than Dakota red.

There are hardly any pictures that show both of Knopfler's Strats together. Left the 80470 and right the 68354.

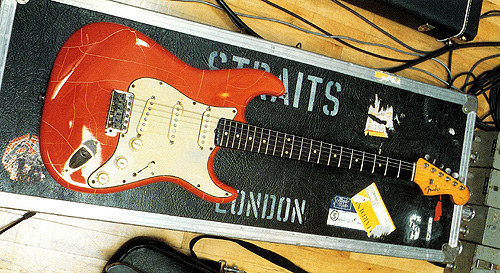
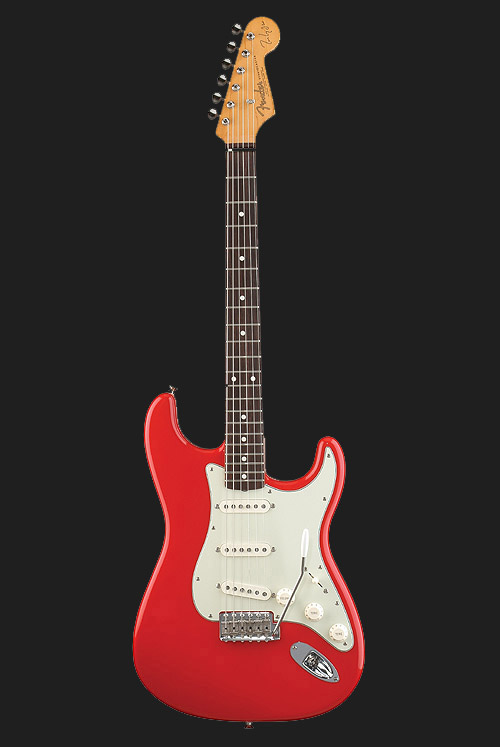
When Fender built something like a reissue of Knopfler’s red Fender with the MK signature model, it seems they copied this red and called it hot rod red. Note however that as it seems meanwhile Knopfler’s 68354 Strat was refinished again as the old finish cracked (see picture below) so it can’t be said with certainty if this hot rod red is the same as that Dire Straits red.

The 68354 Strat - In the early 90ies the finish was damaged
MK Signature Strat in hot rod red

All kinds of red are generally photo reactive which means they easily fade when exhibited to light, something that was especially true for vintage laquer. Especially some fiesta red guitars today look rather pinkish so that names like Salmon Pink are also common. As said, this is the same as fiesta red, there has never been an official name like this in Fender’s ‘official’ custom colour chart.

Guitar refinishing – nitro vs poly and how to remove a polyester finish

Over the last days I was working on a Strat project. I had some parts from a 70ies Japanese Strat copy, which together with an American Fender neck and a loaded pickguard should make a nice part-o-caster.

In the seventies many guitars were finished with polyester. This finish is like a coat of hard plastic (actually it is rather a resin). It is easy to apply because you can sand it without much danger of sanding through. This was Fender’s main reason for changing from nitro to polyester in about 1968. Before, a finish that was sanded through had to go back into the production process and had to be repainted, one of the reasons why it was common to find a finish over some other colour.

As far as sound is concerned, almost everyone agrees that a thin nitro finish that allows the body to vibrate much more than the thick plastic-like polyester  allows a better  sound with clearer treble. This might  surprise those who think that an electric guitar is  like a blog of wood and the sound depends only on the pick-ups and not on the acoustic qualities of the wood or other parts. But this is really the case, I can definitely hear how a Strat or any other solid-body guitar sounds from playing it without amplifier.

So it makes sense to remove a polyester finish and replace it with a nitro finish. Many modern guitars are finished with polyurethane by the way, which is a bit similar to polyester but thinner so the sound is not that much affected.

Removing polyester is tricky. The problem is that chemical paint strippers in most cases will not work. There are some types that are said to work more or less but the ones I tried did not. I solved the task twice some yeasr ago by sanding down the finish, but believe me this is nothing that you ever want to do. It takes ages to sand through such a thick plastic coat.

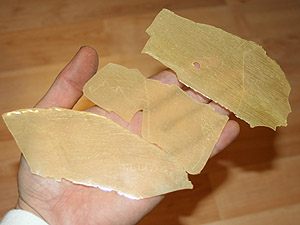
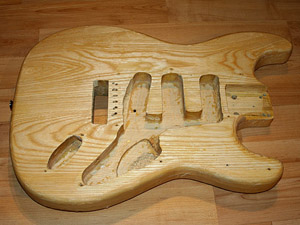
This time  I tried something else, something that was recommended in a guitar forum: heat. I used a cheap heat gun and a scraper, and with these tools the finish was off in about 2.5 hours, including the control cavity. I did not heat  until the resin bubbles (which others have described) because then I could only remove rather small pieces. With less heat it was possible to move the scraper under the poly coat and to run it between the wood and the poly so that I could remove rather big pieces of the poly coat. The wood was not hurt and looked almost untouched. I can imagine that if a guitar was refinished with poly over an existing nitro finish, it might be possible to restore the original finish this way.

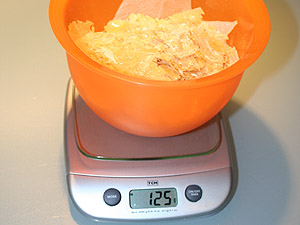
All the poly chips had a weight of about 125 grams (4.4 ounces), and in the case of one of those jobs I did a few years ago it was even 200 grams (7 ounces), so the guitar becomes noticably lighter.

removing-poly-finish-1
After applying heat the polyester finish could be removed with a scraper
This way the finish came off sometimes even in big pieces
The body after the job
The poly coat had a weight of about 125 grams (4.4 ounces)
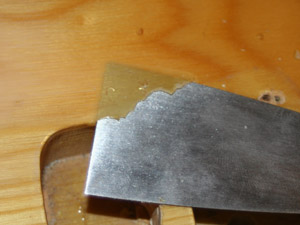
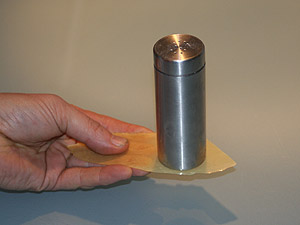
This picture gives you an idea of the thickness of the polyester coat

Sound differences

As said, there is definitely a difference, but it depends on the thickness of the poly coat, and it is still a subtle difference. The high end is clearer while the poly sounds more compressed. Some years ago I made a sound sample to document the difference between the poly finish and the bare wood so you can decide for yourself. The sound difference when playing the guitar yourself appears even bigger than on this clip. The sample was recorded with the same strings and the same setup, one time before the job, and again immediately after. What you hear are the harmonics at the 12th fret. You can click into the blue status bar to a/b compare it at different positions.


Should I or shouldn’t I?

The question if the amount of work and the costs are worth the increasement of sound or not cannot be answered generally. First it must be said that refinishing an original Fender – even if it is one of the least desired, heavy 70ies Strats – drastically decreases the value of the guitar! Even those Japanese vintage guitars like the first Squiers, Tokai Springy Sounds, Grecos and so on, will be worth more with the original finish, even if it is poly (the more expensive ones were sometimes nitro anyway).

If you however have a guitar that was refinished anyway, you have not much to lose. If you are not sure if your finish is nitro or poly (polyester or polyurethane) you can find it out with the following trick: take some ordinary paint thinner and apply it to a tiny spot of the finish (e.g. under the pickguard or near the tremolo springs). If it solves the finish (paint is removed or it becomes dull) it is nitro, if not it is poly.

I think almost all of Mark Knopfler’s guitars are nitro, at least his vintage guitars, the Schecters, the Pensas and the MK signatures are. I can’t think of one that might be poly, maybe his blue Fernandes (but maybe not), but I don’t know about some of the odd ones like his Teisco Spectrum, the Eco on “Song for Sonny Liston”, and some more. His two red Fenders from that early Dire Straits days were both refinished but these do not seem to be poly, either.

Recommended artist: Chris Rea – some rare video clips

Most people who like Mark Knopfler might know Chris Rea, who has been popular especially here in Europe since the 80ies. Due to health problems, he ended his active career some yeasr ago.

I first heard of him in 1983 when a friend of mine who was also into Dire Straits at that time told me about a concert he was at with the then super-group SAGA. It seemed he did not like them that much, but he was enthusiastic abouth the support act that noone had heard of before, a guy who played a clean guitar sound similar to  Dire Straits on an old fiesta red Stratocaster: Chris Rea. It was the same week when Rockpalast broadcasted a Chris rea concert from a small club in Bochum (very near to the place I lived then here in Germany), so I did not miss this concert (and even taped it with  a cassette tape – this was before people had video recorders). I recently found a few clips from this and other concerts concerts on youtube and want to share them with you.

The first track was the first one of the concert, so the first I ever heard. It is called “Nothing’s happening by the sea“. Chris plays his red Strat which is tuned to open E through a clean silver-face Fender Twin Reverb (and a brown Fender Bandmaster for distorted sounds).The bass is also cool: a fretless Steinberger, note how it interacts with the guitar licks. Unfortunately the uploader of this clip disabled embedding so I cannot show it directly here on this site, instead click here to open it in a new window on youtube.

A second early track that never made it to a hit is Candles. This time Chris plays a Strat in standard tuning. This clip is from an open-air Rockpalast concert on the famous Lorelei Rock above  the river Rhine in Germany, a place where Dire Straits also played on a festival in 1979.

And finally, one of my all-time favorites of Chris’ setlist, the song Steel River from the same concert as the one before. It is amazing how the song develops through different stages from a slow ballad to the rock outro. Also that break at 4:30 is pretty cool. Have fun!

Backing tracks player to jam with at JamCenter.com

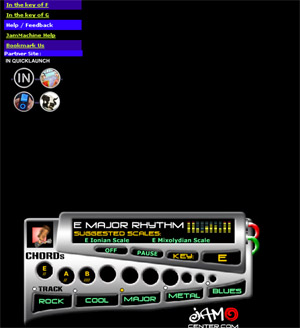
loop-playerI recently surfed into a nice site called JamCenter.com where you find a “jam machine” – an online loop player that plays backing tracks to jam with. Simply choose a key in the left sidebar, scroll down (the loop player appears at the very bottom of the page), select one of the styles (rock, cool, metal,…), and the player will play a loop of a certain length. The chords are displayed so you know what is being played. The sound of the recordings is alright and the styles are often tasteful and fresh. Have fun!
If you ever need an online guitar tuner or a metronom, these can be found there as well.

Understanding songs – chords and structure analysis of True love will never fade

Have a look at the following chords, these are all chords for the song True Love Will never Fade, the opener of  Mark Knopfler’s latest album Kill to get crimson. Each chord is played for one bar:

C F Dm G C F Dm G C F Dm G C F Dm G C C F F C C Dm G C C F F C C Dm G F G  C C F F C C Dm G C C F F C C Dm G C Dm G C Am F G F G C F Dm G C C F F C C Dm G C C F F C C Dm G C C F F C C Dm G C Dm G C Am F G F G C F Dm G C F Dm G C F Dm G C F Dm G C F Dm G C F Dm G C F Dm G C F Dm G C F Dm G C F Dm G C F Dm G C C F F C C Dm G C C F F C C Dm G F G  C C F F C C Dm G C C F F C C Dm G C Dm G C Am F G F G C F Dm G C C F F C C Dm G C C F F C C Dm  C C F F C C Dm G C Dm G C Am F G F G C F Dm G C F Dm G C F Dm G C F Dm G C F Dm G C F Dm G C F Dm G

Theoretically it is no problem to play the song from this list of chords, you simply have to follow the list and try not to get lost 😉

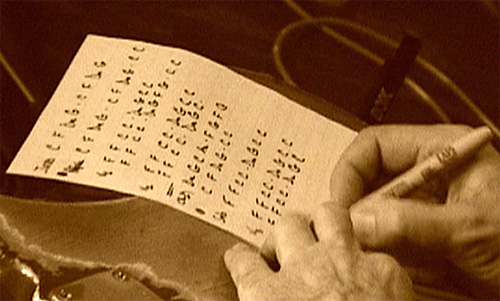
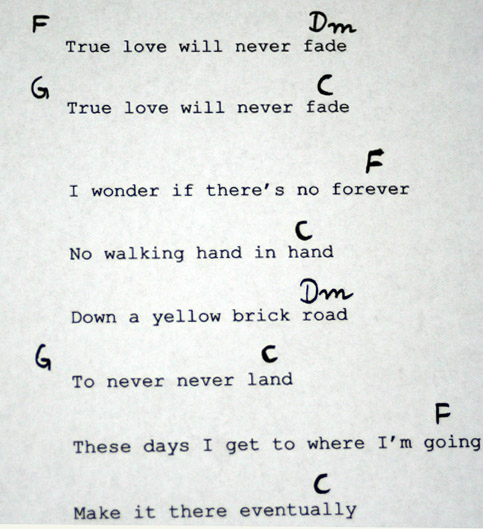
One way to avoid getting lost is  writing the chords next to the corresponding words of the lyrics, something that is common among  singers who accompany themselves. You surely have seen this approach, it might look like this:

true-love-lyrics-with-chords2
Unstructured chart with lyrics and chords

Finding structure

The solution above is common but not ideal because it does not reflect any structure.

You might ask yourself  how you can play such a song without a paper, like professional musicians do on stage? How can you learn a list of 126 chords by heart?

The answer is easy: you need to be aware of its structure, of the patterns and logic it is built up with. Without structure, understanding is not possible. Without understanding, learning and remembering is extremely difficult. It is similar to understanding a huge mixing desk: you might wonder how someone knows what to do with so many knobs and controls, there are actually hundreds of them. But when you have a closer look, you will see that there are several channel strips that all have an identical set of controls. And the controls of each channel strip are structered again in e.g. the EQ section, the aux controls for effect sends, the monitor section, and so on. As soon as you understand it, the number of controls is no problem anymore, and you can find the right knob for each job within short time.

structure-tlwnd
Structuring the chords into corresponding groups is essential (picture from the making-of DVD of Kill to Get Crimson)

Let’s apply the same logic to this song now. First we arrange the chords in groups, or sections. The first group is the intro of the song, and it consists of the first 8 bars. In fact you will find that certain numbers – e.g. 2, 4, 8, 12, 16, 32, … – play an important role in music. These are very often  powers of two.  Indeed music and mathematics are more related than you might think. If you look at these 8 chords, you will see that there is a group of 4 bars (C F Dm G) that is repeated ( 2 x 4 = 8, be aware of the powers of two).

Intro

C F Dm G C F Dm G

Let’s go on and try to identify such groups. After the intro, someting like a chorus begins (“True love will never fade…”). First it is important to understand that the structure of the lyrics has normally to do with the structure of the music, but both are not the same in all details. From the lyrics you might think that the chorus starts when Knopfler sings the first word “True…”, from a musical point of view however, it actually starts with the last word of the line “…fade”). The other words are what is called an upbeat figure, or simply upbeat. They lead over into the next part. A similar upbeat can be found at the beginning of the next part, which starts  with the last word of  “I wonder if there’s no forever…”  at 0:37. Until then, we  have a total of  the following 10 chords:

Chorus

C F Dm G C F Dm G C C

A closer look reveals that we have the same group of 4 chords as in the intro (C F Dm G) which is repated, plus two bars of a C chord that are something like a filler to connect the part with the next. The 10 bars can be subdivides in 4 + 4 + 2, and  we might write it like this instead:

C F Dm G – C F Dm G –  C C

The third part – we might call it verse – starts with “…forever” (0:37). As the following part that starts with “I don’t know what brought you to me” sounds almost identical (melody, chords), we can consider it as a repetition of the part before and call it Verse B , while the previous verse A consists of the following 18 chords.

Verse A

F F C C Dm G C C F F C C Dm G F G  C C

You can see that the first 8 bars start with the same chords as from bar 9 on, and the last two bars are just a filler to link to the next part, so let’s write it like this:

F F C C Dm G C C  – – F F C C Dm G F G  – – C C.

And we can subdivide those groups of 8 bars to groups of 4 bars:

F F C C —  Dm G C C  – – F F C C  – – Dm G F G – – C C.

We see that the first and the third group are identical, while the second and the fourth are similar but not the same. The difference are the chords F G (red) at the end of the third group, they are inserted, they change the pattern. If you left them and played the two bars of C instead, you would have a simple repetition which is on the one hand more logical, but on the other hand it sounds a bit surprising this way, and thus adds something new to the song.

The whole section seems to be repeated with the following verse B (1:14 to 1.44) that can be subdivided in a way similar to verse A:

Verse B

F F C C —  Dm G C C  – – F F C C  – – Dm G C

If you compare it to verse A, you will see that both differ just where those chords previously discussed appear (red). Instead of the F G C C we have only one single bar C here. The total number of chords is for this reason only 15 which is very unusual (16 or 16 + 2 would be normal). We can say that one bar of C is missing, Dm G C C would be normal here (and would in fact sound logical). Leaving out this chord breaks the pattern and again adds something unexpected, it highlights the following part by breaking the rules.

This next part might be called bridge. It consists of 8 bars, and it is followed by 4 bars of the chorus pattern, and finally two bars C to fill to the next part, so we have:

Dm G C Am – F G F G (bridge)

C F Dm G (chorus)

C C  (fill)

All of the following sections are repetitions of these first parts. In detail, we have the

Solo (first 8 bars of verse A)

Verse B (15 bars)

Bridge (8 bars)

Chorus (4 bars)

3 x Chorus (12 bars)

2 x Chorus (solo, where ride cymbal starts)

C F G

The last chords again break with the pattern. The expected would be  something like C F Dm G C, with the last C as the final chord (the song is in the key of C so it should end on a C). The way it is here, however,  sounds again unexpected and thus adds something.

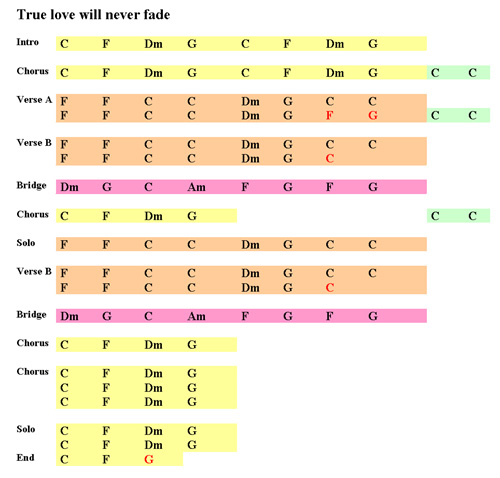
The following chart shows the complete structure of the whole song. I also used different colours to indicate different and related parts. Compared with the unstructered list of 126 chords at the beginning of this article, you can see at one glance which part comes next, where something is repeated, and where something happens that breaks a standard pattern (red chords) . The number of different parts that you need to learn is kept to a minimum.

true-love-will-never-fade-structure-500

Some general notes on structure

At all those positions where a new part begins, a traditional note sheet would display a double bar line. Normally a drummer plays a crash cymbal there, and he might play a drum break before to usher in the start of a new part (on this song the drummer does not because the drum track is kept extremely simple). The beginning of a new part is also a  typical position where new instruments might come in (e.g. note how the electric guitar comes in at the beginning of the first verse B), and the overall volume of the song might change here (note that commercial CD are often mixed at a  rather constant volume as a consequence of the loudness war).

Working with a band

I made the experience that when you work on a song with a band, it is extremely helpful to work with musicians who understand such a concept, and who think in terms of such a structure. Only this way everyone will know e.g. where to start best within the song to practice a particular part of the song, or how to play a difficult piece in a loop to get used to it or to bring it to perfection within shortest time. Everyone will know where to pay attention because something is unusual.

The drummer automatically knows where to play the crash, where to play a break, where to change from hihat to ride, and so on. And only this way you can easily communicate with the other band members: everyone will know what is talked about, what is meant with bridge, first part, second half of … , and so on.

This is common knowledge among good musicians of course, but I know of many who still have not realized these aspects, sometimes even after playing their instruments for decades. But it is never too late for learning 🙂

Note: An analysis of the chords that appear in this song and their harmonic relation can be found in the article about the circle of fifths.

Recording distorted guitars – The digital POD vs the analog Tubeman

One of the  last articles was about how to record a clean guitar, and the POD and the Tubeman have already been mentioned there. This time it is about what these two devices were mainly built for: a distorted guitar sound. You will hear the same track first recorded with the POD (lead and rhythm guitars), then with the Tubeman, both devices were connected directly to the mixing desk.  Here is some background information on both devices.

The POD

The POD by Line 6 was one of the first commercial devices to emulate the sound of different tube amps. You can choose between different Fender, VOX, Marshall or boutique amps. In addition it features a variety of built-in digital effects. Like with most digital devices, the number of different sounds and options is astonishing. You can switch between a Fender Bassman and a Marshall JMT in a second, and you can save all sounds as presets. Due to the headphones output it is also very nice for practising.

The Tubeman

This is the original Tubeman by Hughes & Kettner. It is all analog and features a 12AX7 tube for distortion. It can be used a a floor effect before any guitar amp, or as a recording solution in the studio. Three tone controls plus a mid boost allow different sounds, while the amount of distortion is adjusted with the gain control and a  selector switch to choose one of four different gain patterns (rock, blues, funk, jazz).

There is no headphones out, but outs for the mixer (with speaker simulation) or to the guitar amp (without speaker simulation). As it is anaog, you cannot save sounds as preset of course, and there are no effects available. Although a tube requires  high voltage, it is powered with only 9 V which are internally transformed.

The Verdict

To me the winner is the Tubeman, its throaty sound has a certain warmth that I miss with the POD but maybe your taste is different. And of course a lot depends on the setting on both devices. And don’t forget that the POD is an early digital device, later ones might sound better. I might compare more recent devices against a vintage tube amp in a future article.

What are your thoughts? Use the comment function to let us know.

Micing a guitar amp with two microphones

In this article you will find a sound clip to hear the sound of a guitar amp …
(a) mic’ed close to the speaker (Shure SM 57)
(b) mic’ed at a distance of about 2 m (6 ft.) (Audio Technica AT 4050)
(c) with both microphones [of (a) and (b)] blended together.

The close mic’ing results in a dry and precise sound with hardly room. When you move back the microphone, the guitar will become lower in volume. As the sound reflections from the walls always have the same volume, they will seem to be louder now. In other words, the more you go back from the amp, the more room you will hear. Here it depends on the acoustic quality of your room whether this leads to pleasing or unwanted results.
What is often done is blending the signals of two (or more) microphones. This way you have the precise attack of close mic’ing plus some natural sounding room. You can also pan both microphones differently to create a wider stereo sound in your mix. You should definitely record both sources to different tracks of your recording software to keep all options open in the final mix.

Blending two microphones inavoidably leads to phase issues, some frequencies are cancelled, others are boosted. This effect depends on the distance between both microphones and varies actually with each inch. Many engineers move around the second (or both) microphones while listening (e.g. with headphones) to find the ultimate “sweet spot”, the position that has a magic sound. But this will be covered in a future article.

The video is in youtube high quality. If you have problems with bandwidth, you can watch it in normal quality directly at youtube, click here.

By the way, the amp is a clone of an old Fender Tweed Princeton, model 5F2-A. I built it out of scratch many years ago. It has a ceramic (!) Jensen 10″ speaker from the early 60ies and normally sounds great at all volumes. Its 4.5 watts are ideal for recording, you simply set the only volume control to the desired level of distortion and shape the sound with the single “Tone” control. The guitar is a maple neck Telecaster.

Different ways to record a clean guitar – sound clips for A/B comparing

There are countless ways to record an electric guitar. While some of these do not really work for distorted guitars, you have even more choices when you want to record a clean guitar: you can plug it directly into the mixing desk, or use a DI-box before. Then there are special recording solutions like digital or analog pre-amps that also emulate the influence of the guitar speaker or even the microphone. And of course there is still the old-fashioned way – using a guitar amplifier and one or more microphones.

All of these possibilities have some advantages so it is impossible to say which one is best in a particular sitaution. The video of this article (below)  demonstrates some of these different approaches. This way you can hear yourself what you like and what not. Remember however that there are so many variables even in each single approach, e. g. the pre-amplifier can give you a signal that is much brighter than the guitar amp or much darker – depending on your settings. Nevertheless, the video should reveal some general sound differences, like the very bright direct out of the amp or the rather muddy sound when plugged into the desk with a certain input impedance. You will always hear the same guitar playing the same riff with the same guitar cable (with exception of #3)

Version 1 – Directly into the mixing desk

Here the guitar is plugged into on of the phone-jack inputs of a mixing desk. These are normally designed for line-level instruments like keyboards or pre-amps. The lower volume of the guitar is no problem, but a guitar expects an input impedance (resistance of the input) of a few hundred kOhms. A normal line in has only something like 10 – 100 kOhms however. This circumstance leads to a strong reduction of the guitar pick-up’s resonance peak. This is the frequency at which the pick-up is loudest. It is a result of the pick-ups electrical values like the number of windings and the resistance of the wire of its coil. Typically the frequency is somewhere in the range from 2 – 7 kOhms, and the effect is more pronounced with a single coil pick-up – a reason of the characteristic sharp treble you associate with a Fender guitar. With a too low input impedance these frequencies are dampened and the sound easily becomes a bit muddy.

Version 2 – Using a guitar effect as DI-box

One way to avoid the problem described for version #1 is to use a so-called DI-box (DI for direct injection) – a little device that has a proper input impedance and is plugged between the guitar and the mixing desk. There is another possibility to have the same effect that does not require to buy anything new: use any of your guitar effects as a replacement for the DI-box. A guitar effect has of course a proper input impedance for a guitar, and this is even true if the effect is switched off (with exception of a few effects with a so-called true hardware bypass). You can hear on the video that the sound is much clearer, you have more treble.

Version 3  demonstrates the influence of the guitar cable

This is the same setup as in version #2 with exception of a different cable between the guitar and the effect. Here I used a long guitar cable (9m = 30 ft. ) instead of the 3m (10 ft.) cable used on the other versions. The sound is darker. This effect has nothing to do with the quality of the cable or its internal resistance. Instead it results of the capacity each shielded cable has. It acts like a capacitor which changes the resonance frequency of the pick-up (see  version #1).  For example, a Fender Stratocaster pick-up has a resonance frequency about 6 kOhms, but if you connect a capacitor to it, this frequency moves down to maybe 4 kHz (with a small capacitor of a few hundred pF) or maybe even to 2 kHz with a slightly bigger capacitor. You can easily measure the capacity of a guitar cable and you will find values up to more than 1nF ( = 1000 pF) .  The capacity has to do with the size of the cable: if all other dimensions are the same, a cable with 20 ft. will have a capacity twice as high than a cable with 10 ft. – no matter if both cables are low or high quality.

Version 4 – The POD

The POD by Line 6 was one of the first digital amp emulators. These convert the guitar signal into digital data and use mathematical algorithms to imitate the effect of a vacuum tube, a guitar amp circuit, or even a guitar speaker. Note that the picture was taken later and does not show the setting used on the recording.

Version 5 – A Tubeman tube pre-amp

The Tubeman by Hughes & Kettner is an analog device that uses a real tube. It has gain and volume controls plus different tone controls and allows a great variety from clean to heavily distorted sounds. It has outputs for  a mixing desk or a guitar ams (with or without speaker simulation). Note that the picture was taken later and does not show the setting used on the recording.

Version 6 – A guitar amp with a microphone

The heading says it all. In this case a Music Man guitar amp with a Shure SM57 microphone. The SM57 does not cost much and is something like a standard for recording guitars.

Version 7 – The direct out of the amp

Some guitar amps have a direct out. With this jack the signal from the pre-amp stage can be routed into another power amp or into a mixing desk. However, the guitar speaker is important to shape the tone, it actually cuts all frequencies above something like 6 kHz. As the speaker is missing now, you get a very crisp but sometimes rather harsh sound. Especially for distorted guitar sounds, this almost never leads to good results.

Note that the amp setting is the same as in the previous example (!)

What does it sound like in the mix?

The next video sequences demonstrate how some of the previous setups sound in a complete mix. All the raw sounds have been slightly EQ’ed, and some compression, reverb, and delay has been added.

You will hear:

a) Directly into the desk through the effect (see version #2)

b) The POD (see version #4)

c) The Tubeman (see version #5)

d) The mic’ed amp (see version #6)

e) The direct out of the amp (see version #7)

The video is in youtube high quality. If you have problems with bandwidth, you can watch it in normal quality directly at youtube, click here.

Which version sounds best to you in the mix?

View Results

Loading ... Loading ...