This blog post is about the next step in my Tele Dream Machine project – the wiring of all controls. The main difference to a standard Fender Telecaster wiring is due to the tapped Walk of Life pickups (or Schecter F521T / F520T in the original)
Unfortunately the original Omni Pots, those square conductive-plastic potis with the push-pull switch that Schecter used in the Van Nuys era, are no longer available. These were made by Allen Bradley – who are out of business for a long time – or by Bourns who also dropped these from their product range. The only alternative are standard push-pull potis. You can get these here in my online shop, also from Bourns by the way.
Generally, the original Schecter wiring is like the standard Tele wiring – with exception of some different component values and the Omni Pots that were required to switch the tapped pickups between their normal and the fatter sound. The potis had a 500k value, something that seems a bit unusual for a Tele (Fender first had 250k and later 1 M). 500k seems to be a good compromise for both the normal and the full coil of the tapped pickups.
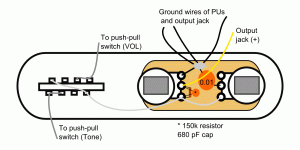
The tone cap was a 0.02 uF ( sometimes also 0.025 uF or 0.01uF) ceramic disk cap. This value is much smaller than the Fender standard (0.05 uF). Schecter used a 680 pF treble bleed cap with a 150k resistor in parallel on the volume poti (Fender standard: 0.001 uF = 1000 pF and no resistor). The resistor changes the taper of the poti.
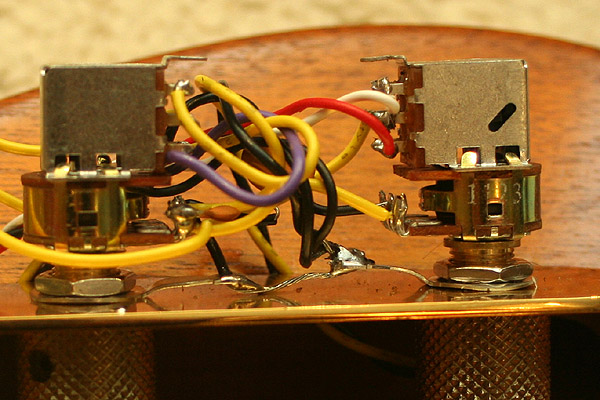
One problem is that normally all ground wires of a Fender Telecaster are soldered on the back of the potis. This was not possible with the Omni Pots as these had a plastic case, and is neither ideal with a standard push-pull poti. Schecters solution was to use a small brass soldering plate that was hold by the two potis. All ground wires were soldered to one point on this plate then. As an alternative to cutting such a plate from a metal foil, you can use two washers with ground lugs, and connect all ground wires to these instead (see photo below).
8 different pickup combinations on a Tele
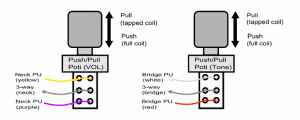
Operation is like on any Tele, with exception of the push-pull potis. Pulling out the VOL poti enables a beefier sound on the neck pickup, while pulling out the TONE poti does the same trick for the bridge pickup. This way you can get 8 different sounds of the two pickups instead of 3 sounds on Fenders (n, b, n+b, N, B, N+B, N+b, n+B, with small letters for the normal and capitals for the fatter sound).
Here is a schematic:

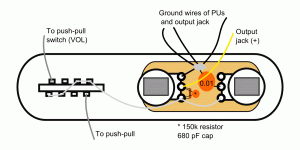
Alternatively, the 3-way switch can be connected like this (Fender style), the result isthe same:

The wiring on the two push-pull potis is shown in a separate drawing here:

The following picture shows how you can use two washers with soldering lugs (included with my push-pull potis) instead of the brass ground plate that Schecter used.


3 thoughts on “Building a Telecaster Dream Machine – Part 3 – The wiring”
Hi There,
Cant wait to hear this wonder.
Nice solder pic. Lot of work to do this.
I have a custom telecaster inspired on the ‘WLife tele’ but only on the colors.
My tele has a Hb at neck and vintage 3 saddles bridge. But the color is identical.
Cheers
Barnes & Noble have a book called “the Illustrated Directory of Guitars” Edited by Ray Bonds. It is a smaller version of another book by the same title. My copy has a jazzbox and a superstrat on the front.
Anyways, in it are close up pictures of a lot of Mark Knopfler’s guitars. His repainted rosewood fingerboard ’61 Strat with the cracked pickguard; the Jurassic strat; his ’58 Les Paul and The Walk of Life Telecaster.
Now, throughout the book are also examples of the many reds Fender has used: candy-apple red; fiesta red; torch red; and dakota red. To me, it looks like the Walk of Life Tele is Fiesta. I’ve reached this conclusion by comparing it to a factory custom Tele in the same book, which was painted in fiesta red.
I assume that since they probably used the same photographer throughout, the colors are true to each other, even if they are not true to life.
Great site.